

Table of Contents
- Introduction
- Prerequisites
- Create the NitroStack Flight Booking Project
- Configure Duffel
- Configure Auth0 for OAuth 2.1
- Start the Server
- Step 10: Test the OAuth Configuration
- Step 11: Connect the MCP Server to Cursor
- Step 12: Flight Booking Tools
- Step 13: Complete Architecture
- Step 14: Security Best Practices
- Conclusion
Introduction
What is MCP (Model Context Protocol)?
The Model Context Protocol (MCP) is an open standard created by Anthropic that allows Artificial Intelligence (AI) models and client applications (such as Cursor IDE or Claude Desktop) to safely connect to external tools, databases, and APIs. Instead of hardcoding custom integrations for every AI application, MCP standardizes how tools are discovered, invoked, and executed across different client environments.
Why Flight Booking is a Great MCP Use Case
Flight booking is an ideal use case for AI agents. When planning travel, users often have complex, multi-variable requests such as finding available flights between two cities, comparing prices across airlines, inspecting baggage rules, and booking tickets. An AI assistant powered by an MCP Flight Booking server can execute these multi-step workflows naturally through simple conversational prompts.
Why Authentication is Essential for Side-Effecting Tools
Read-only AI tools (such as searching a public document database) present low risk. However, flight booking tools perform side-effecting operations: real-world actions that create financial commitments, charge credit cards, or alter reservations.
If an MCP server exposes booking endpoints without authorization, any client or unauthorized user could initiate financial transactions or view sensitive passenger data. By implementing Auth0 and OAuth 2.1, we enforce the Principle of Least Privilege: every tool request must carry a cryptographically signed Access Token containing explicit user-granted scopes (read, write, admin).
What We Are Going to Build
In this step-by-step tutorial, you will build a production-ready, secure Flight Booking MCP Server using TypeScript.
High-Level System Architecture Flow

Core Component Responsibilities
| Component | Responsibility |
|---|---|
| NitroStack SDK | Provides the TypeScript framework for the MCP server, defining tools, routing incoming MCP requests, enforcing OAuth 2.1 token validation, and handling client transport. |
| Duffel API | Serves as the real-time flight data aggregator and booking engine, supplying live flight schedules, ticket pricing, airport searches, and reservation creation. |
| Auth0 | Acts as the OAuth 2.1 Identity and Authorization Provider, managing user authentication, issuing JSON Web Tokens (JWTs) with PKCE protection, and enforcing permission scopes. |
Prerequisites
Before starting this tutorial, ensure you have the following accounts and tools installed:
- Node.js: v20 or higher installed on your system.
- NitroStack CLI: Accessible via
npx @nitrostack/cli. - Duffel Account: A free developer account at Duffel.com to obtain a Duffel API key.
- Auth0 Account: A free developer tenant at Auth0.com.
- MCP Client: An MCP-compatible client such as Cursor IDE.
Create the NitroStack Flight Booking Project
To kickstart our server development, we use the official NitroStack CLI. NitroStack provides a pre-configured Flight Booking template that comes with built-in OAuth 2.1 authentication middleware.
Run the following command in your terminal:
bashnpx @nitrostack/cli init my-flight-booking --template typescript-oauth
Why Use the Scaffolding Template?
Building an MCP server from scratch requires configuring JSON-RPC transport protocol handlers, setting up flight service abstractions, and implementing OAuth 2.1 token verifiers. The typescript-oauth template initializes a clean, production-ready project structure with all necessary dependencies and flight-booking tools pre-configured, letting you focus on integration and security setup.
Next, navigate into your newly created project directory and install the required dependencies:
bashcd my-flight-booking
Create the .env File
Environment variables keep sensitive API credentials, secrets, and server configurations out of your source code.
Copy the provided environment template file to create your local .env file:
bashcp .env.example .env
Why .env is Crucial
- Separation of Concerns:
.envallows you to configure different settings for local development, testing, and production without altering source code. - Security: Secrets like API keys and OAuth client secrets must never be hardcoded into code.
⚠️ Never commit your
.envfile to Git! Verify that.envis listed in your project's.gitignorefile. Committing secrets to public repositories exposes your service to unauthorized usage and security breaches.
Our Flight Booking MCP server integrates two external services that require environment configuration:
- Duffel API: For searching and booking flights.
- Auth0: For securing MCP tool execution with OAuth 2.1.
Here is a conceptual structure of your initial .env file:
bash# Duffel Flight API DUFFEL_API_KEY=YOUR_DUFFEL_API_KEY # Auth0 OAuth 2.1 Server Configuration AUTH_SERVER_URL=https://YOUR_AUTH0_DOMAIN
We will populate the complete set of configuration variables in the following sections.
Configure Duffel
Duffel provides the live flight data, airport search, offer pricing, and ticket booking capabilities used by the NitroStack Flight Booking template.
How Duffel Integrates with NitroStack
textNitroStack MCP Tool → Flight service → Duffel API → Flight data / booking
When an AI model executes an MCP tool (e.g., search_flights), the NitroStack server passes the request parameters to the flight service, which calls Duffel's REST API. Duffel communicates with global distribution systems (GDS) and airlines, returning real-time flight offers back to the user.
Obtaining Your Duffel API Key
- Log in to your account on the Duffel Dashboard by signing up at https://duffel.com.
- Navigate to your Developer/API Keys section in the dashboard menu.
- Generate and copy your test API token (e.g.,
duffel_test_...).
Adding the API Key to .env
Open your local .env file and set the DUFFEL_API_KEY variable:
bashDUFFEL_API_KEY=YOUR_DUFFEL_API_KEY
🔒 Treat your Duffel API key as a password. Never commit this key to GitHub or share it publicly.
Configure Auth0 for OAuth 2.1
To secure our MCP tools against unauthorized execution, we configure Auth0 as our OAuth 2.1 Identity and Authorization Provider. Follow these chronological setup phases.
Phase 1: Auth0 Tenant Setup & Client Application Registration
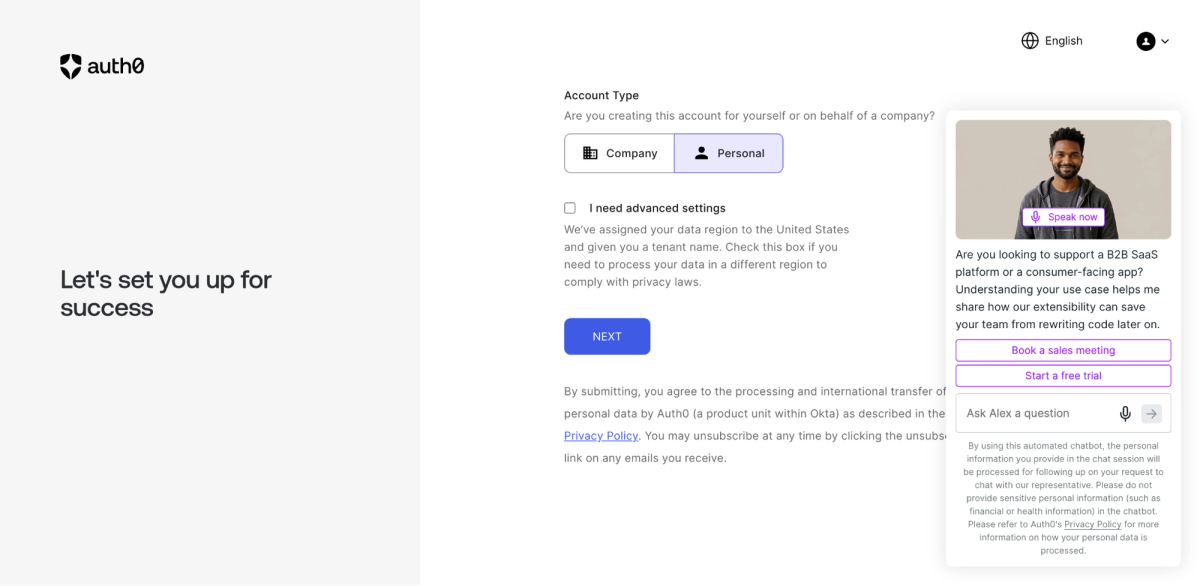
Step 1: Initialize Auth0 Tenant
Log into the Auth0 Dashboard. If creating a new account or tenant, choose your region and set up your development tenant domain (e.g., dev-YOUR_TENANT_ID.us.auth0.com).
Step 2: Register the MCP Client Application
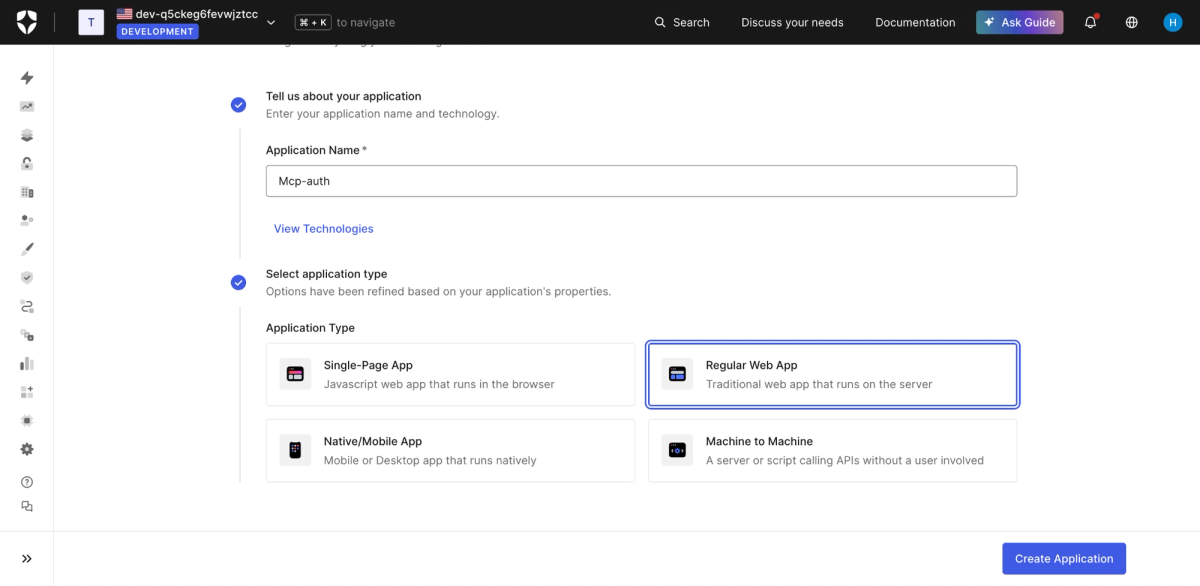
- In the Auth0 left-hand navigation menu, select Applications → Applications.
- Click Create Application in the top right corner.
- Enter your application name:
Mcp-auth. - Select Regular Web App as the application type.
- Click Create.
Step 3 (A): Record Application Credentials
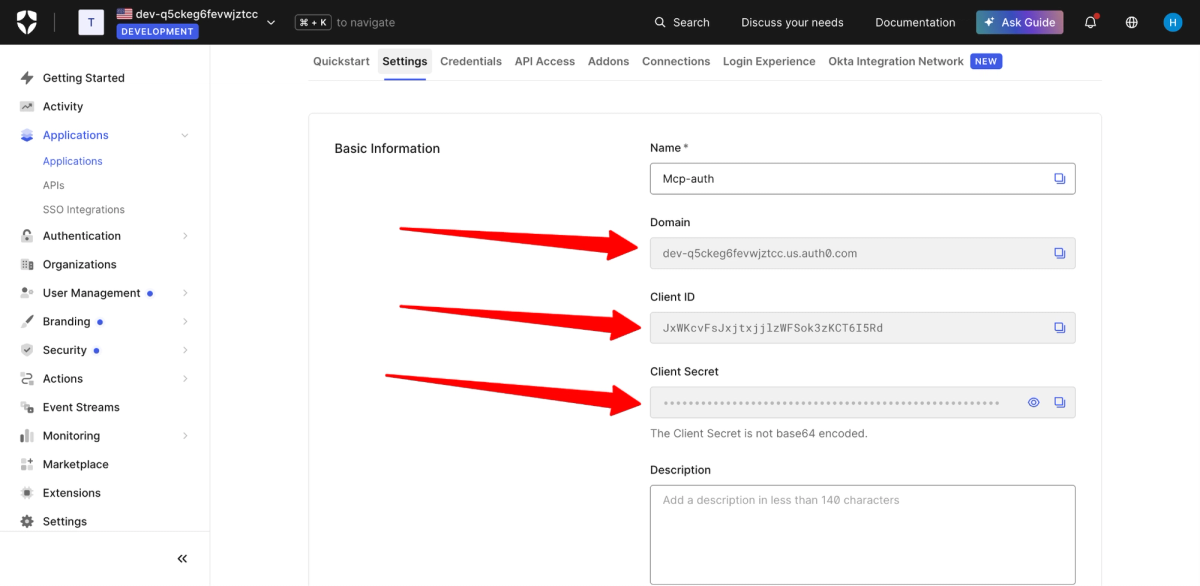
Once created, navigate to the Settings tab of the Mcp-auth application. Copy your application details for configuration:
| Field | Value |
|---|---|
| Domain | YOUR_AUTH0_DOMAIN (e.g., dev-YOUR_TENANT_ID.us.auth0.com) |
| Client ID | YOUR_CLIENT_ID |
| Client Secret | YOUR_CLIENT_SECRET |
Step 3 (B): Promote Connection to Domain Level
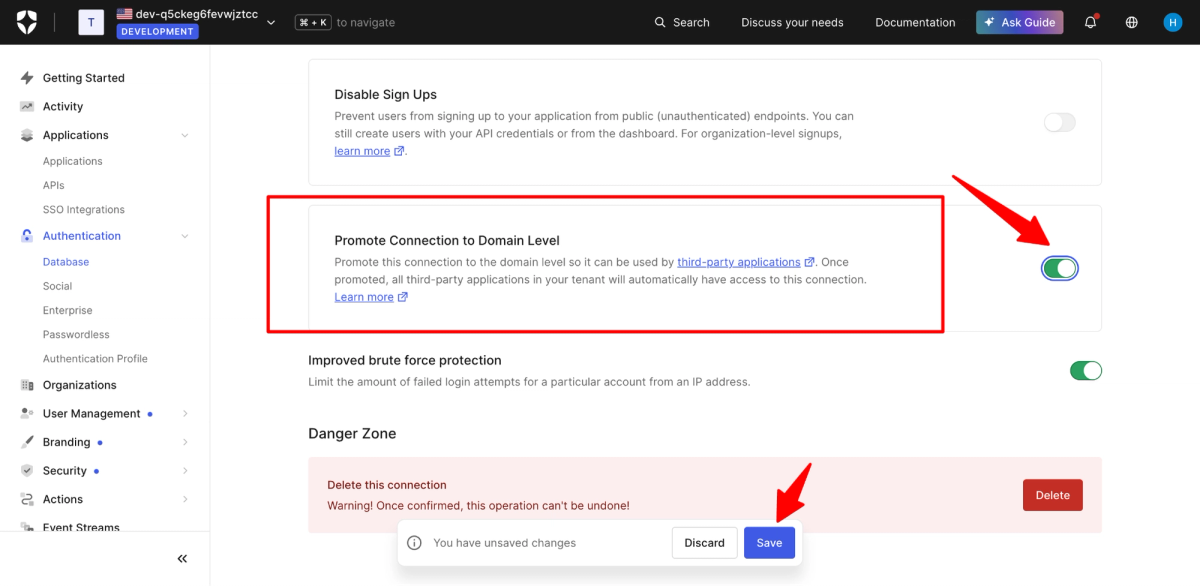
In your Auth0 dashboard navigation, go to Authentication → Database.
- Open your database connection settings.
- Toggle Promote Connection to Domain Level to ON.
- Click Save.
Why this is required: Promoting the connection ensures that client applications and MCP gateways across your tenant can authenticate users against this database connection.
Phase 2: Define MCP Gateway API & Granular Scopes
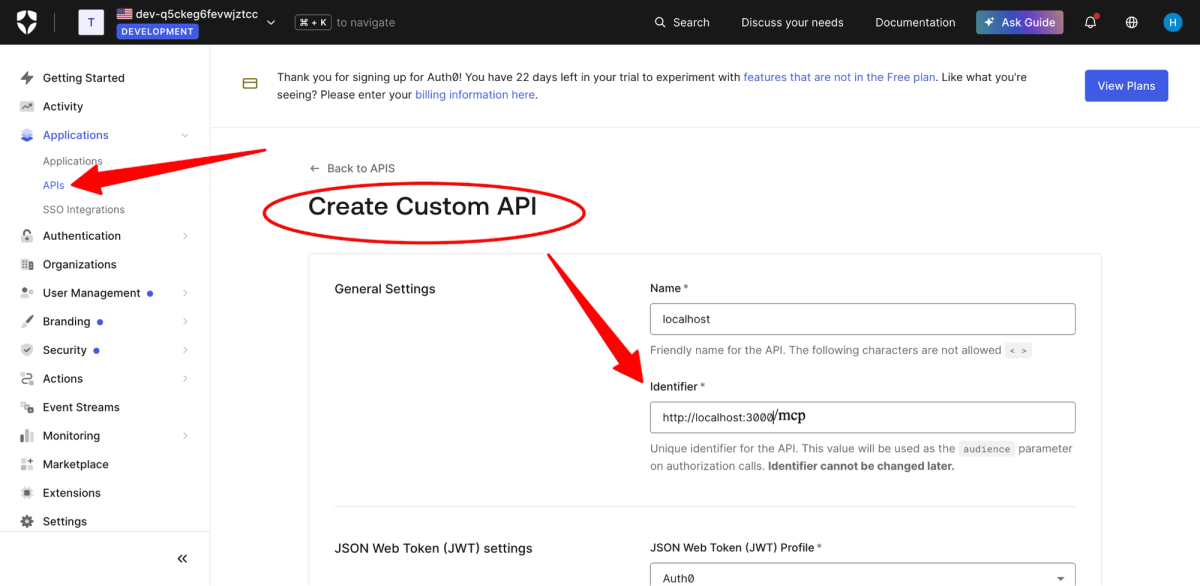
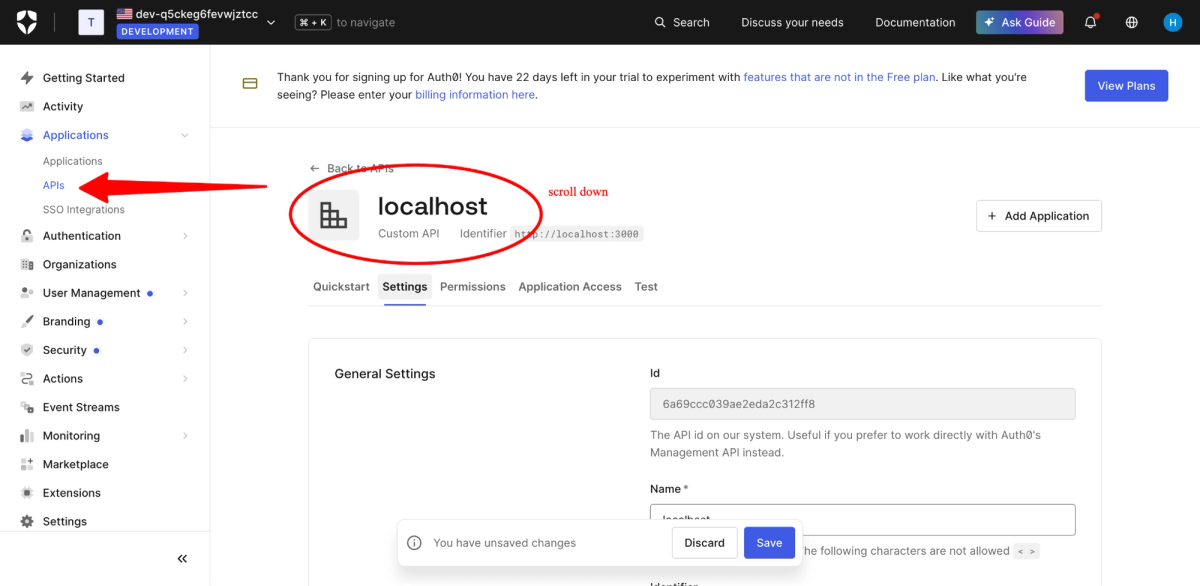
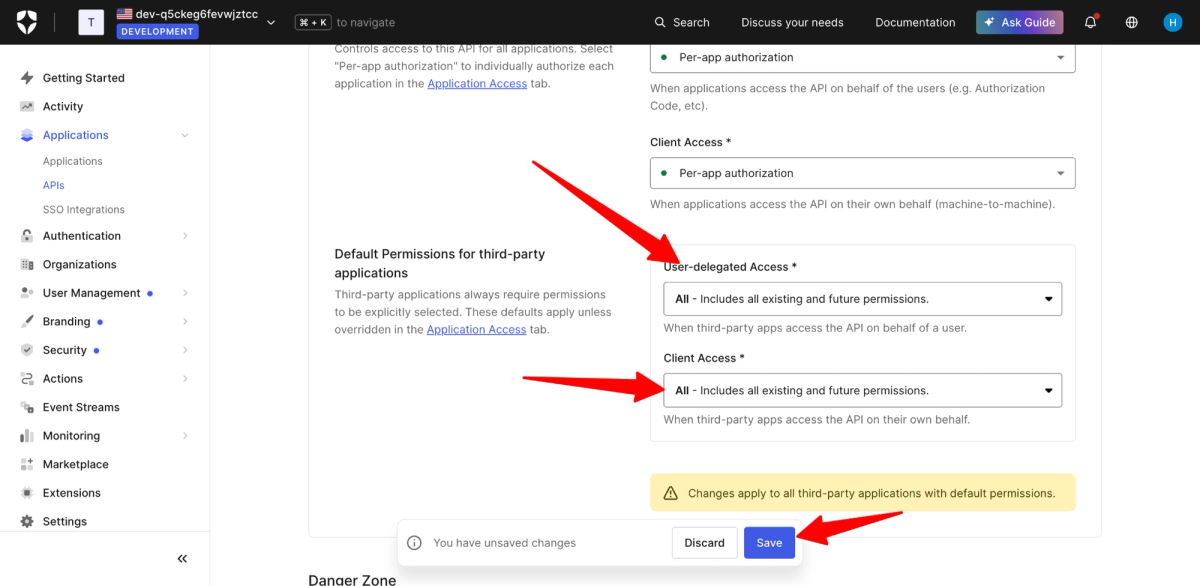
Step 4: Create the Custom API Endpoint
- In the left navigation menu, go to Applications → APIs.
- Click Create API.
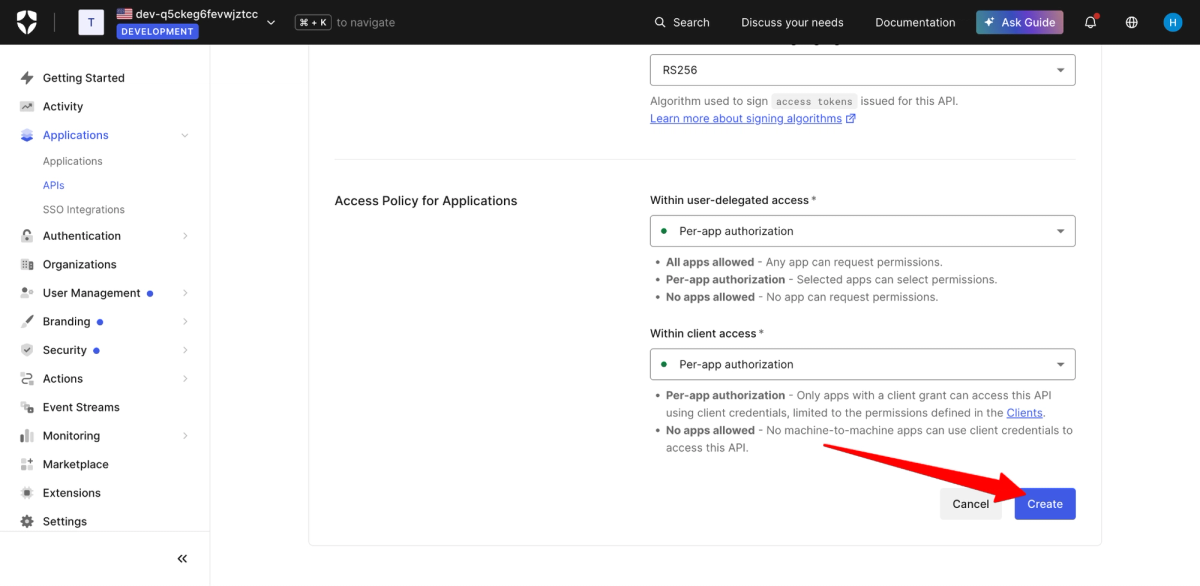
- Configure the settings:
- Name:
MCP Gateway API - Identifier (Audience):
http://localhost:3000/mcp(Note: this URI cannot be modified after creation) - Signing Algorithm:
RS256
- Name:
- Click Create.
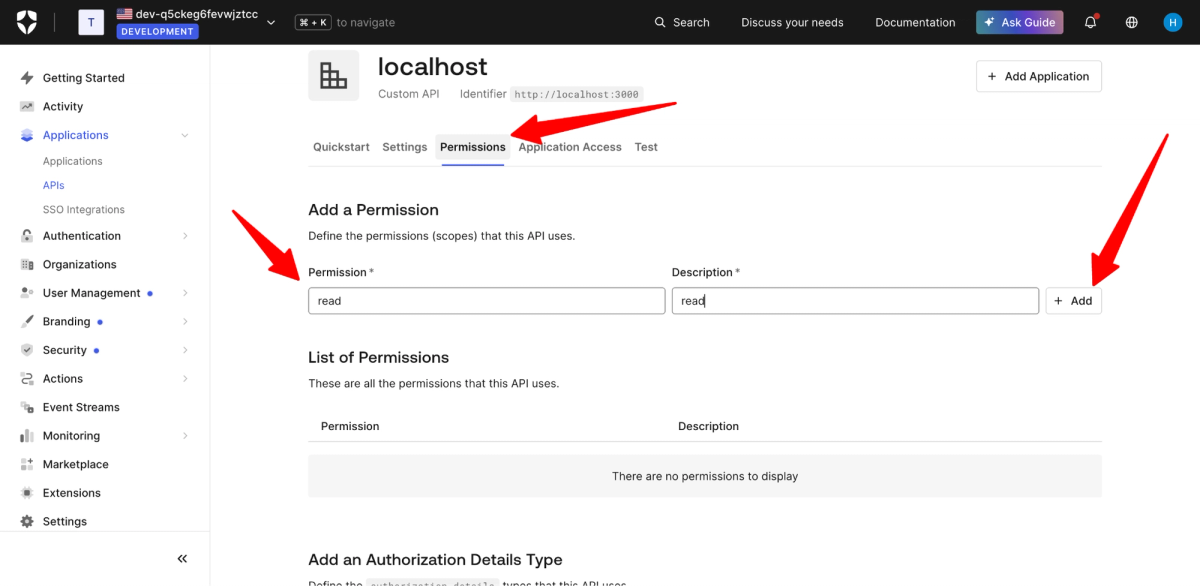
Step 5: Define Granular Permissions (Scopes)
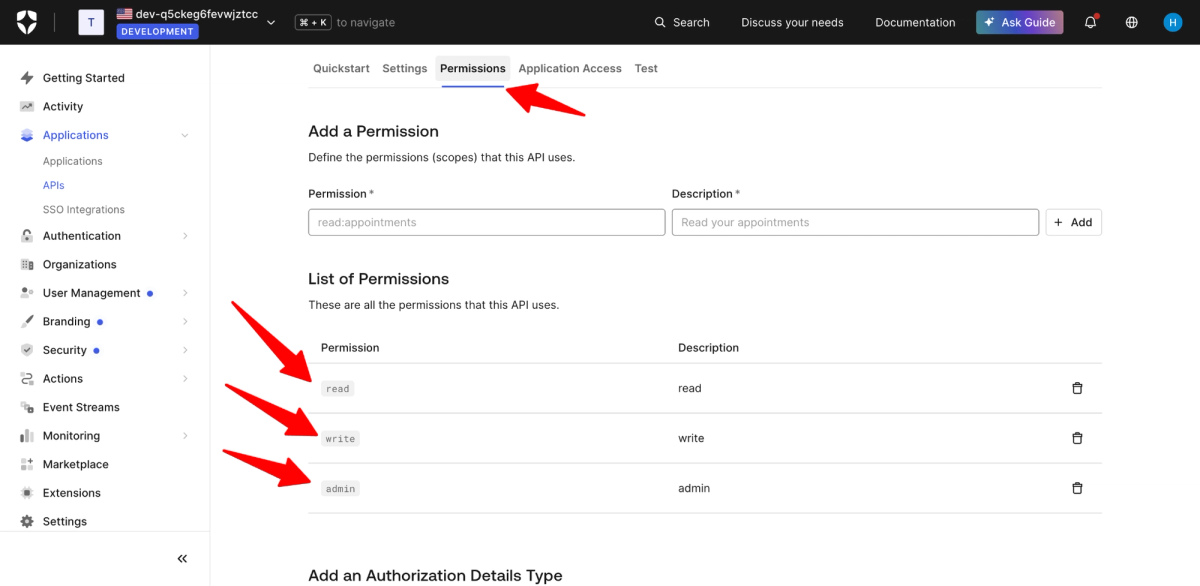
To enforce fine-grained authorization across flight-booking tools, define three granular permissions under your API settings:
-
Click the Permissions tab inside your new API (
http://localhost:3000/mcp). -
Add the following permissions:
Permission Description readRead access to gateway tools and flight search data writeWrite access for modifying resources and booking flights adminAdministrative access for sensitive operations -
Click Add for each permission.
Step 6: Grant Application Access to Scopes
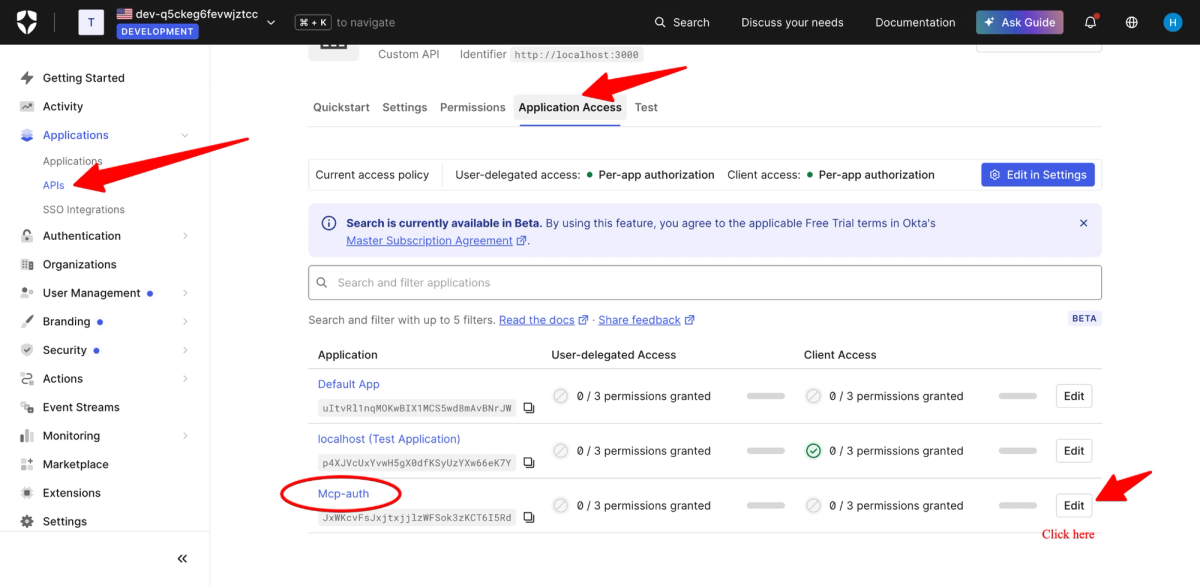
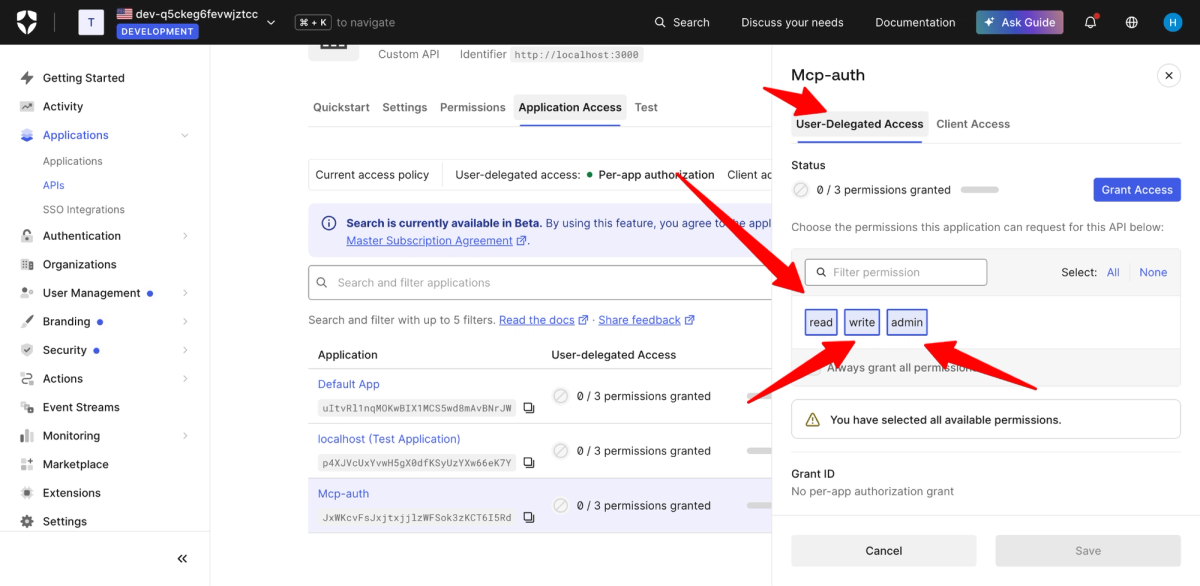
- Click the Application Access tab inside your API settings.
- Locate the
Mcp-authapplication in the list and click Grant Access (or Edit). - Under the Client Access tab, select all granted scopes (
read,write,admin). - Click Grant Access to authorize permissions.
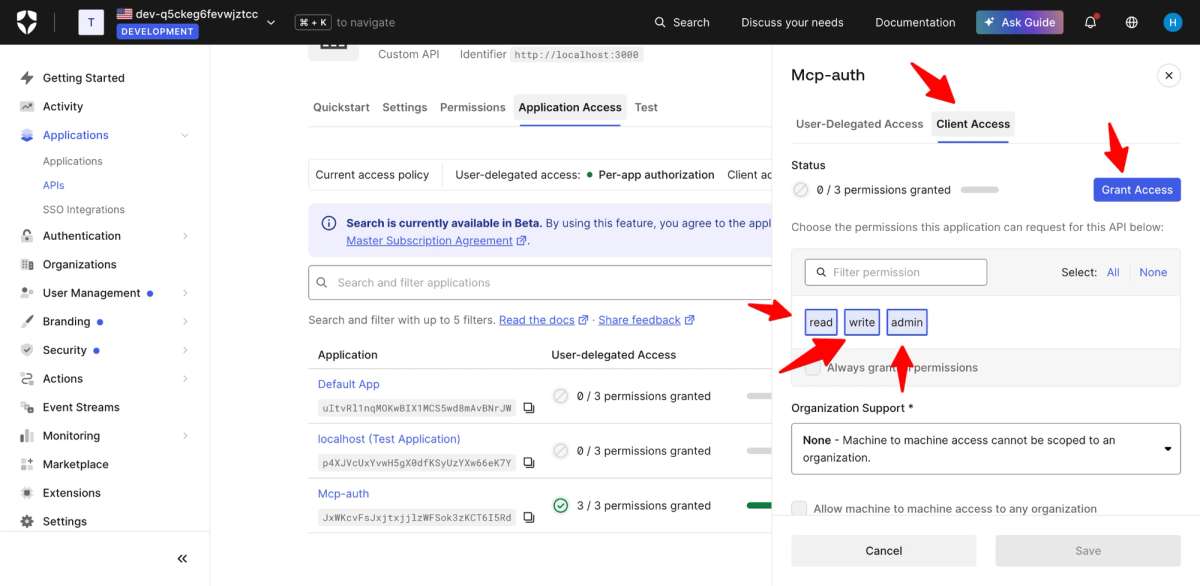
Phase 3: Configure Callbacks, CORS & Security Settings
Step 7 (A): Whitelist Callback URLs and Allowed Origins
Because MCP clients handle OAuth authorization code redirects dynamically, callback and CORS URLs must be explicitly whitelisted in Auth0.
-
Navigate back to Applications → Applications →
Mcp-auth. -
Scroll down to Application URIs:
Allowed Callback URLs:
textcursor://anysphere.cursor-mcp/oauth/callback http://localhost:8787/callbackAllowed Origins (CORS):
textcursor://anysphere.cursor-mcp/oauth/callback http://localhost:8787/callback -
Scroll to the bottom and click Save Changes.
Step 7 (B): Enable Cross-Origin Authentication
To allow browser extensions and desktop client applications to execute authentication flows directly:
- In
Mcp-authsettings, locate Cross-Origin Authentication. - Toggle Allow Cross-Origin Authentication to ON.
- Confirm that your Allowed Origins include
cursor://anysphere.cursor-mcp/oauth/callbackandhttp://localhost:8787/callback.
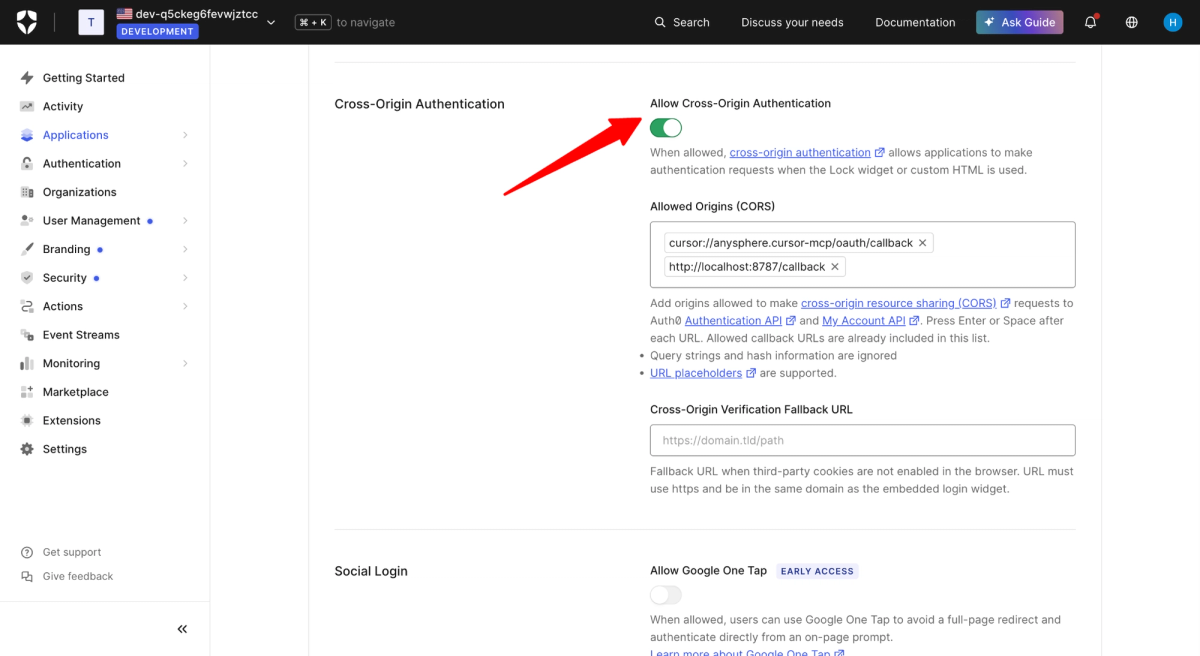
Step 8: Enable Dynamic Client Registration (DCR) via Tenant Advanced Settings
Dynamic Client Registration (DCR) allows third-party MCP clients and local development tools to dynamically register with your Auth0 authorization server following the OpenID Connect specification.
- In the Auth0 left-hand navigation sidebar, click Settings.
- Select the Advanced tab from the top navigation bar.
- Scroll down to Dynamic Client Registration (DCR) and switch the toggle to ON.
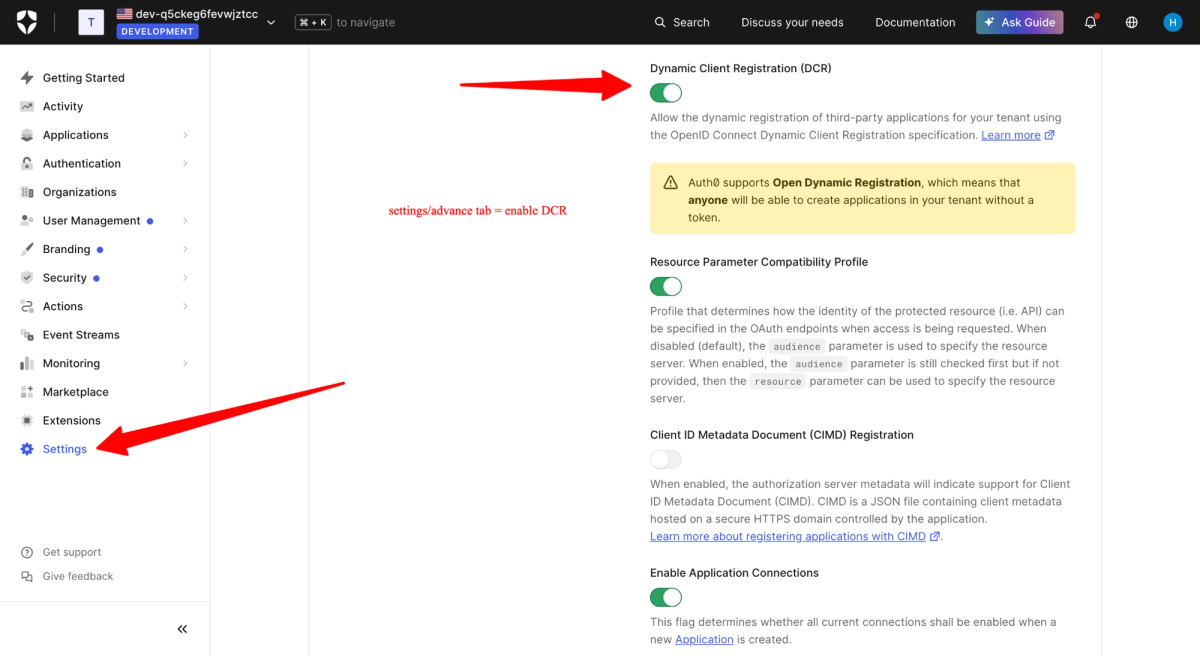
Phase 4: Configure MCP Server & Environment Variables
Step 9: Domain Derivation Rules & Environment Variable Setup
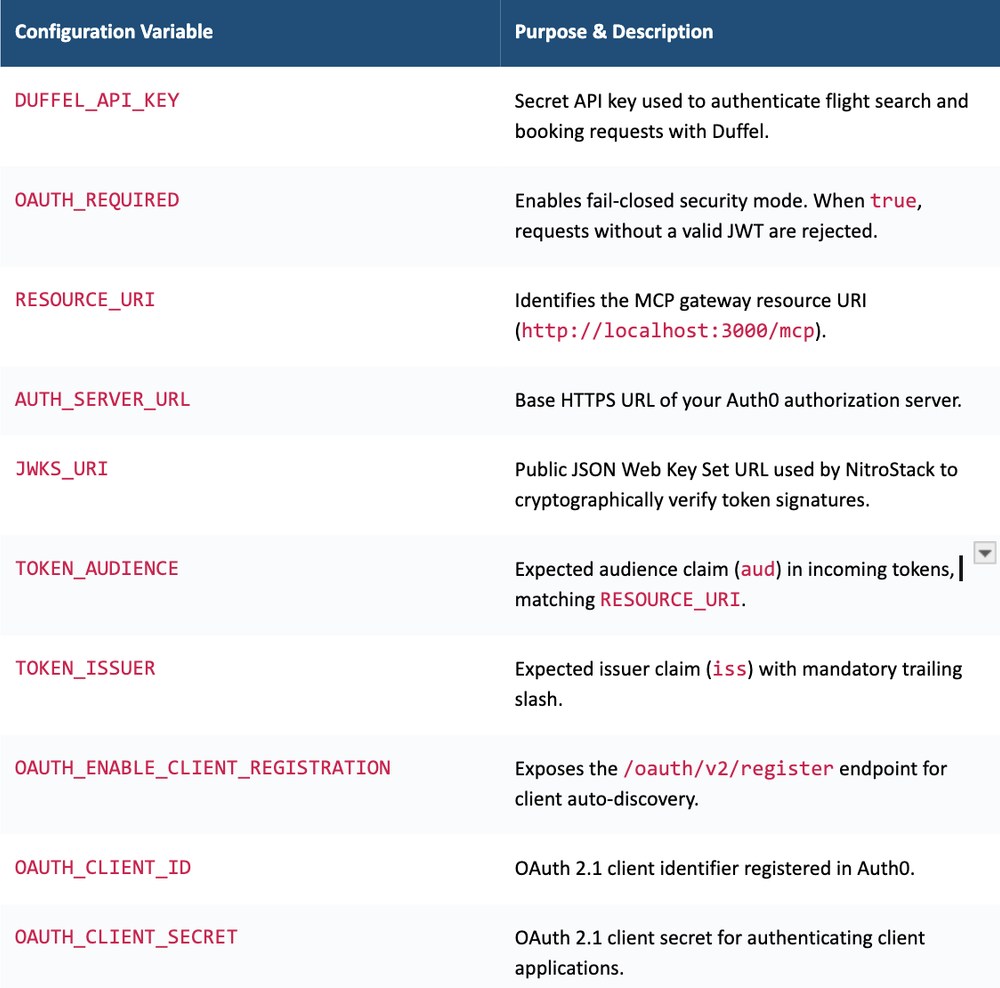
From your raw Auth0 Domain (YOUR_AUTH0_DOMAIN), three core environment variables are derived deterministically:
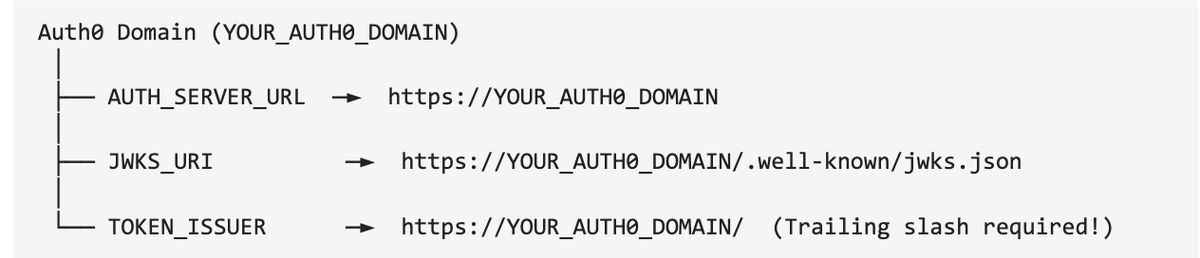
Why the trailing slash on
TOKEN_ISSUERmatters: Auth0 strictly includes a trailing slash/in theiss(issuer) claim of all generated JSON Web Tokens (e.g.,https://dev-xyz.us.auth0.com/). If your.envfile omits the trailing slash onTOKEN_ISSUER, JWT signature verification in NitroStack will fail due to an issuer mismatch error.
Credentials Pass-Through Rules
OAUTH_CLIENT_ID: Copy the Client ID directly from your Auth0Mcp-authApplication settings.OAUTH_CLIENT_SECRET: Copy the Client Secret directly from your Auth0Mcp-authApplication settings.
Complete .env Configuration
After gathering your Duffel API key and Auth0 OAuth 2.1 credentials, populate your final local .env file as shown below:
bash# ============================================================================= # 1. Flight Booking Integration (Duffel) # ============================================================================= DUFFEL_API_KEY=YOUR_DUFFEL_API_KEY # ============================================================================= # 2. OAuth 2.1 MCP Security Gate # ============================================================================= # Set OAUTH_REQUIRED to true to enforce authentication on all MCP tool endpoints OAUTH_REQUIRED=true RESOURCE_URI=http://localhost:3000/mcp # ============================================================================= # 3. Auth0 Tenant Authorization Server Configuration # ============================================================================= AUTH_SERVER_URL=https://YOUR_AUTH0_DOMAIN JWKS_URI=https://YOUR_AUTH0_DOMAIN/.well-known/jwks.json TOKEN_AUDIENCE=http://localhost:3000/mcp TOKEN_ISSUER=https://YOUR_AUTH0_DOMAIN/ # ============================================================================= # 4. Dynamic Client Registration & OAuth Credentials # ============================================================================= OAUTH_ENABLE_CLIENT_REGISTRATION=true OAUTH_CLIENT_ID=YOUR_CLIENT_ID OAUTH_CLIENT_SECRET=YOUR_CLIENT_SECRET
Breakdown of Environment Variable Groups
Start the Server
With .env fully configured, start your NitroStack development server by running:
bashnpm start
What Happens When You Start the Server
- Environment Loading: NitroStack loads
.envvariables into runtime memory. - SDK & Service Initialization: Initializes the Duffel API client with your
DUFFEL_API_KEY. - OAuth Middleware Startup: Fetches the public key set from
JWKS_URIand activates JWT validation middleware. - Transport Endpoint Binding: Exposes the MCP transport endpoint at
http://localhost:3000/mcp.
Step 10: Test the OAuth Configuration
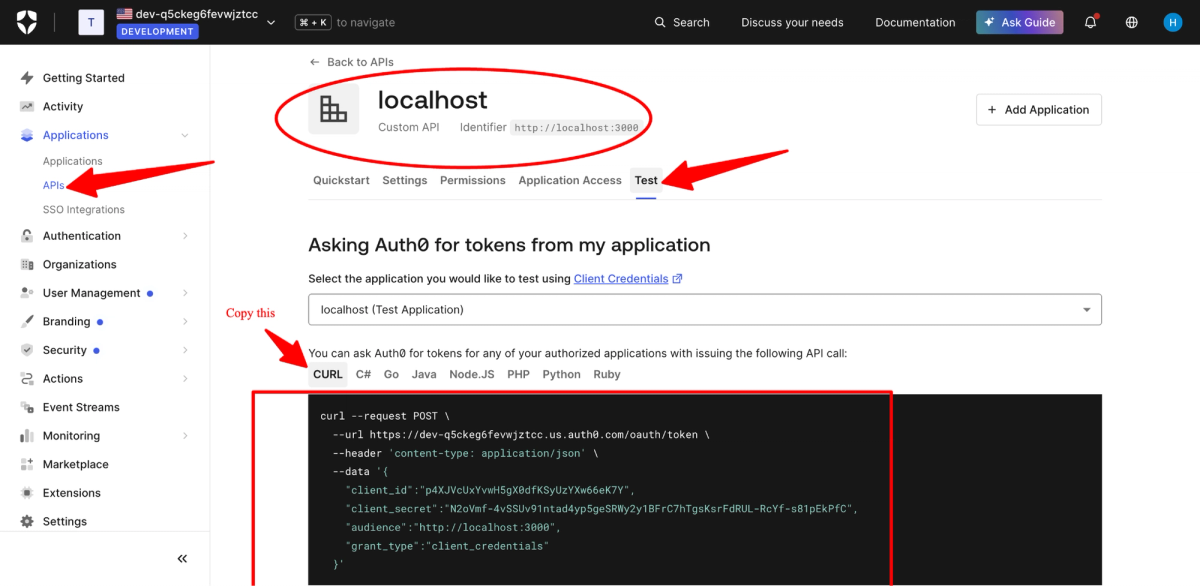
Before connecting your IDE, verify that Auth0 correctly issues access tokens for your API audience (http://localhost:3000/mcp).
Step 10 (A): Verify via Auth0 Test Dashboard
- In the Auth0 sidebar, go to Applications → APIs → select
MCP Gateway API. - Switch to the Test tab.
- Select
Mcp-authfrom the application dropdown.
Step 10 (B): Execute Terminal Token Verification (cURL)
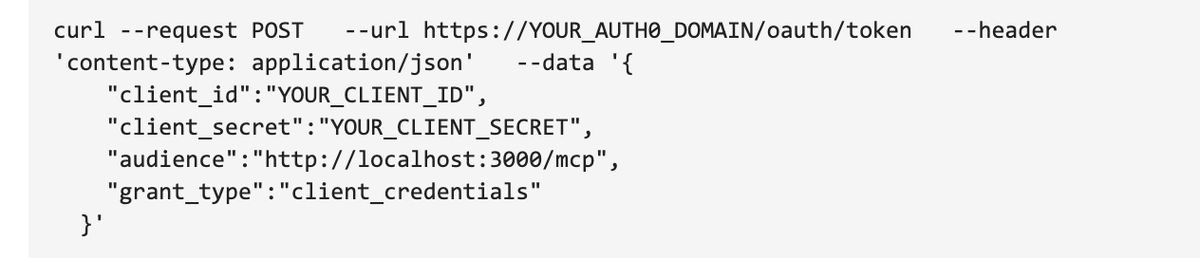
Run the following curl command in your terminal to request an access token using the client_credentials grant:
Expected JSON Response
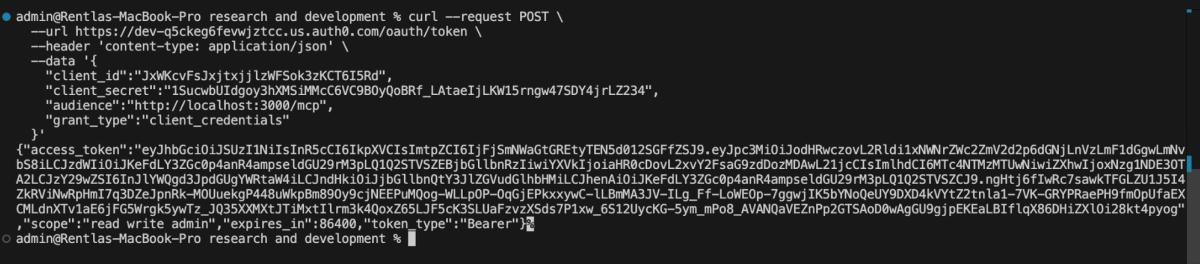
Auth0 will return an HTTP 200 payload containing a Bearer JWT.

Response Key Fields
| Field | Meaning |
|---|---|
access_token | Cryptographically signed JWT containing user claims and scopes. |
scope | Confirms that read, write, and admin permissions are granted. |
expires_in | Token validity period in seconds (86,400 seconds = 24 hours). |
token_type | Standard Bearer token specification for OAuth 2.1. |
Step 11: Connect the MCP Server to Cursor
Now that your server is running and Auth0 token issuance is verified, you can connect the MCP Flight Booking server to Cursor IDE.
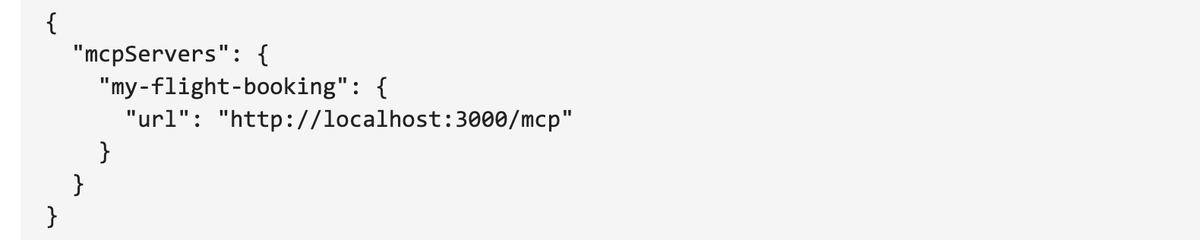
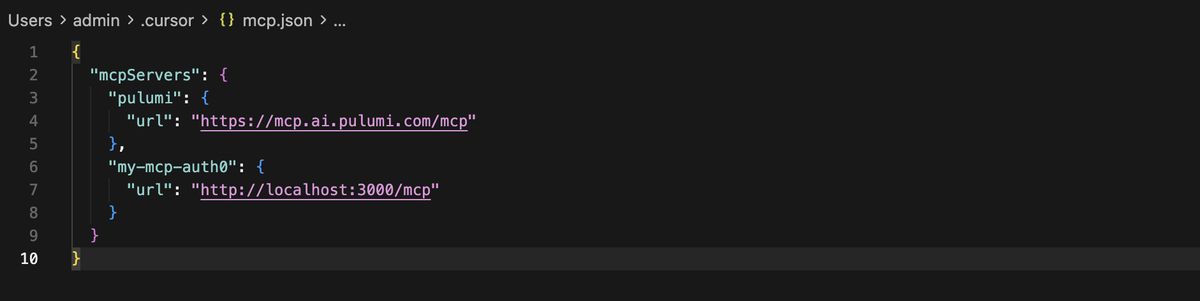
Step 11 (A): Configure mcp.json in Cursor
- Open Cursor IDE.
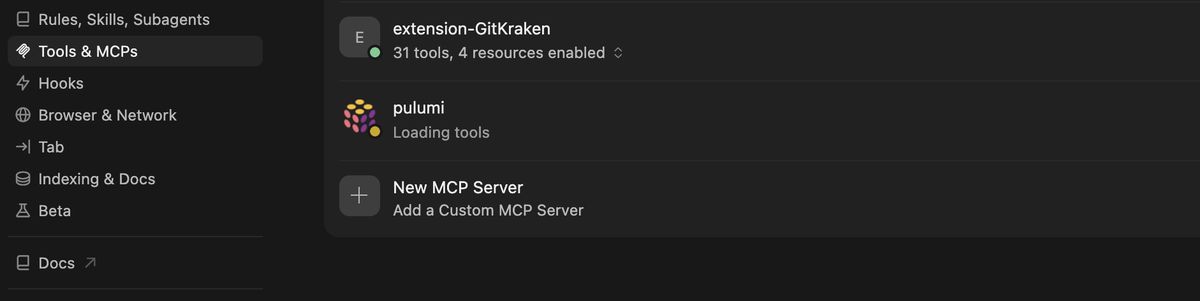
- Navigate to Settings → Tools & MCPs (or edit
~/.cursor/mcp.json). - Click Add New MCP Server and enter your server details:
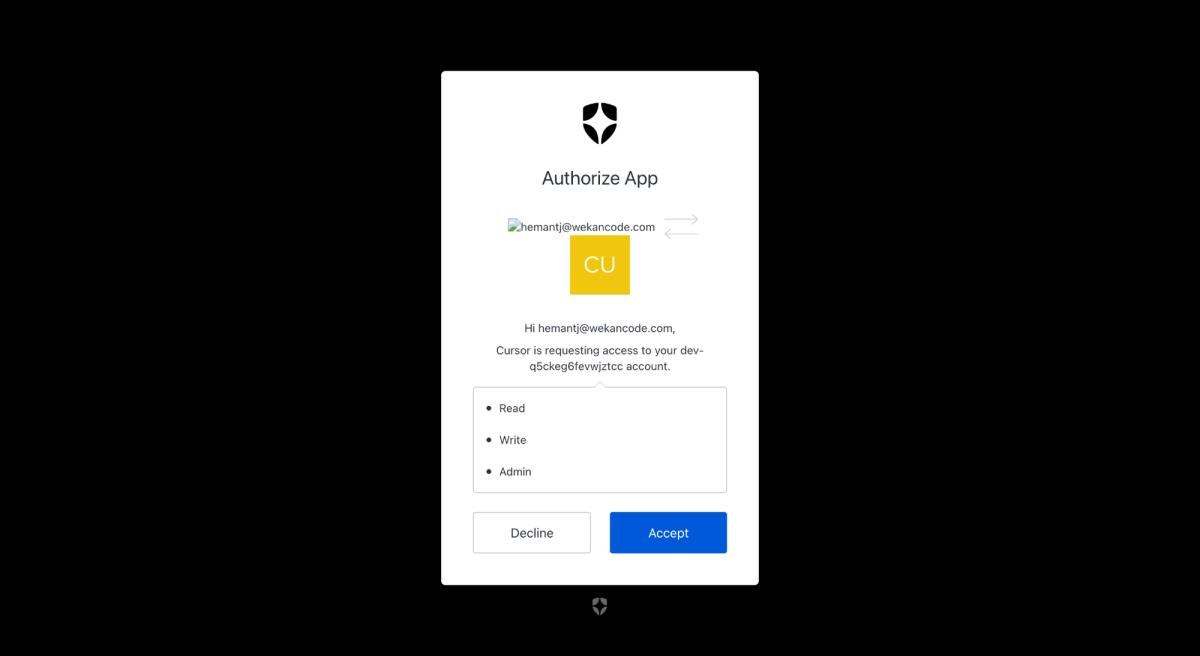
Step 11 (B): Complete the Authorization Sequence
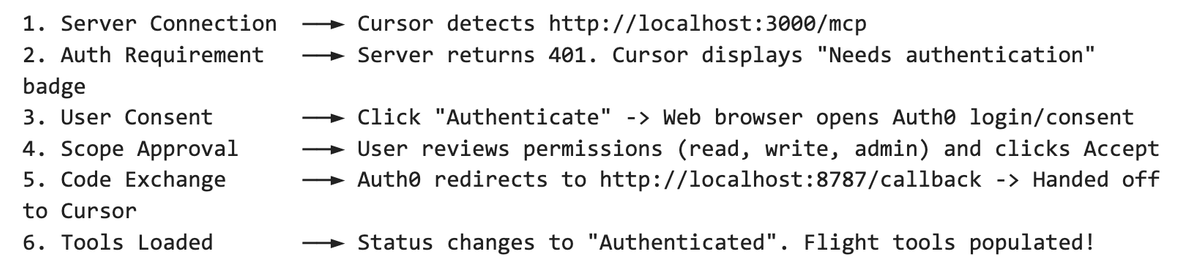
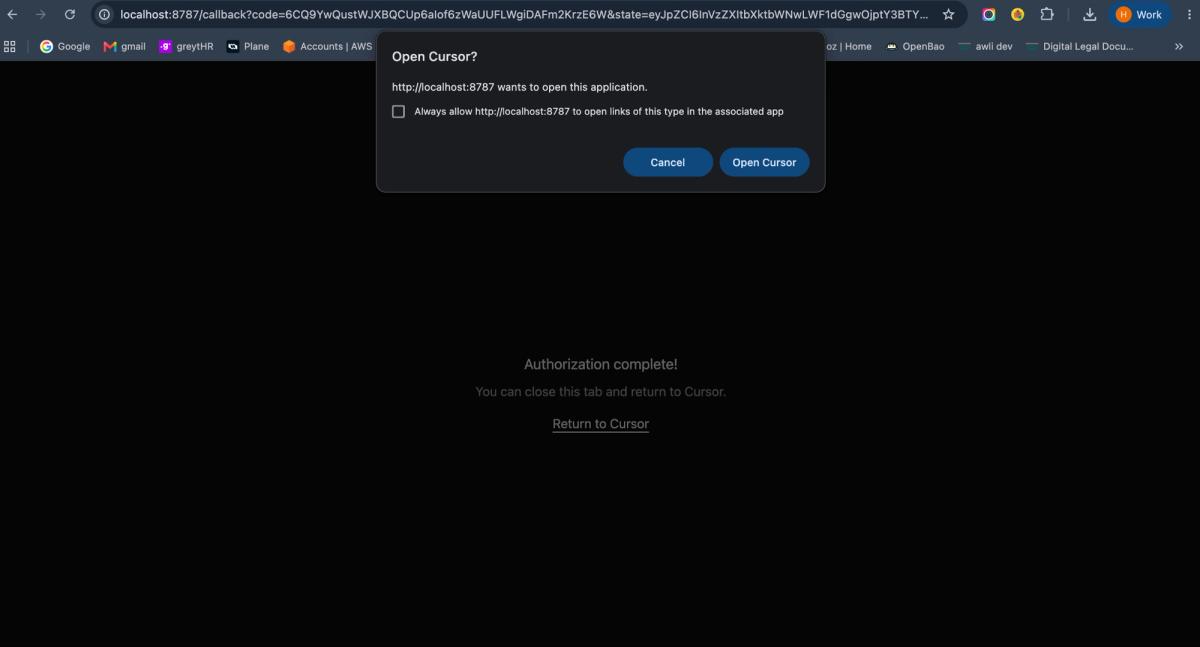
Detailed Flow Screenshots
-
Needs Authentication Badge: Cursor detects that the MCP endpoint requires OAuth 2.1 authorization.

-
Auth0 Consent Screen: Browser opens Auth0 consent prompt requesting permission scopes.
-
Browser Callback Handoff: OAuth callback server completes code exchange and returns control to Cursor.
-
Authenticated State & Tools Loaded: Cursor verifies active session and registers flight tools.

Step 12: Flight Booking Tools
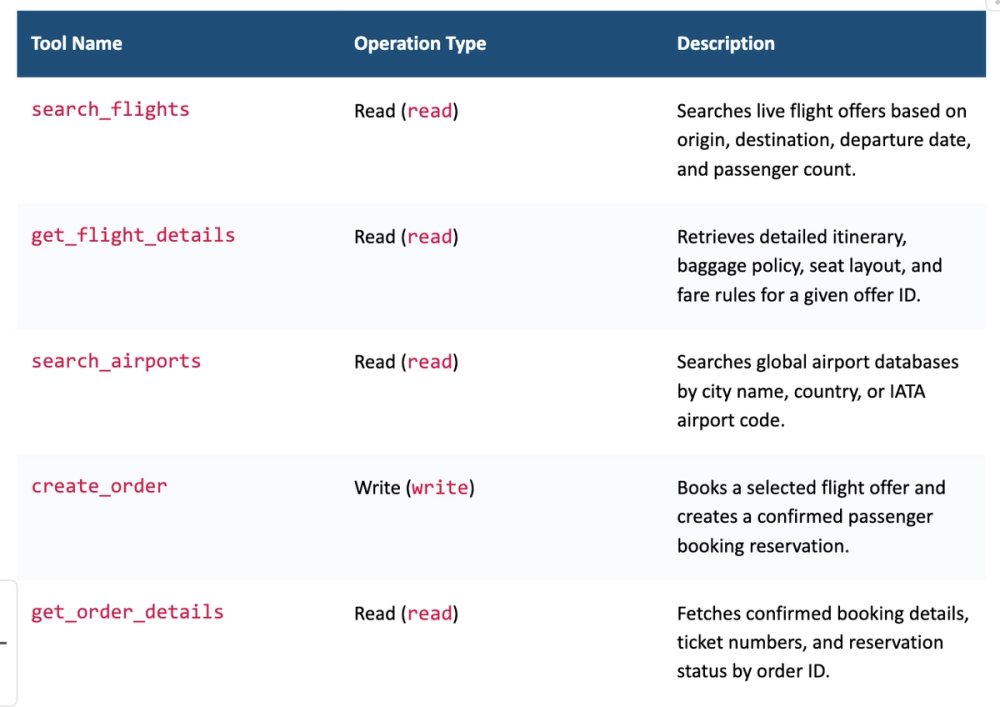
The NitroStack Flight Booking template provides five primary tools for handling flight workflows.
Summary of Available Flight Tools
Example Agent Interaction
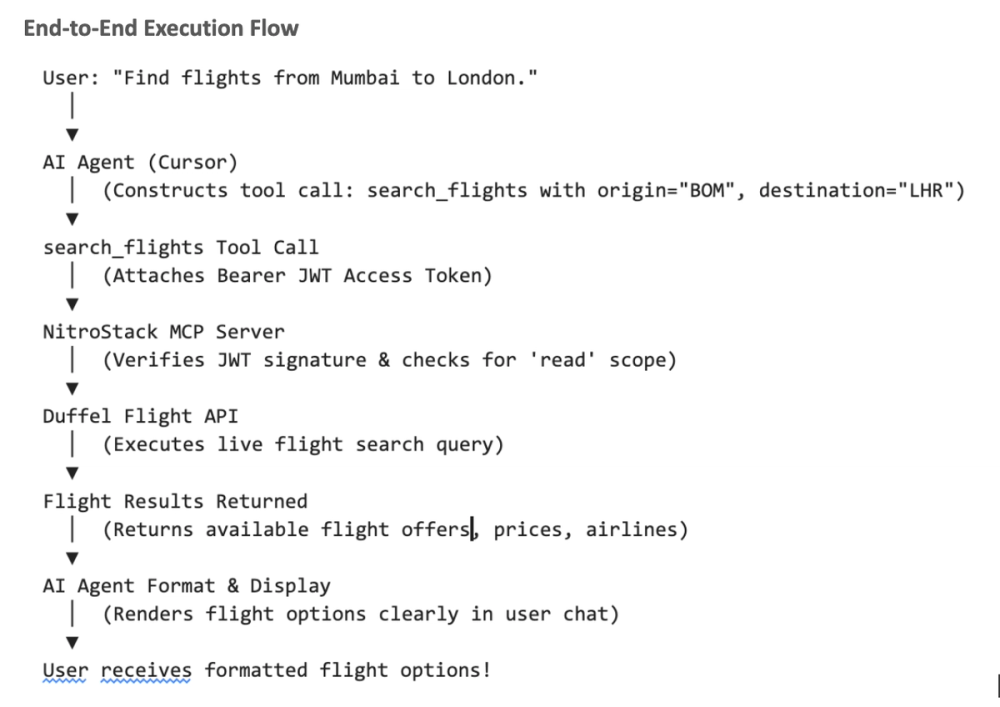
Scenario Prompt
A user opens Cursor chat and types:
"Find flights from Mumbai to London."
Step 13: Complete Architecture
Here is the complete end-to-end architecture diagram showing how all components interact securely:
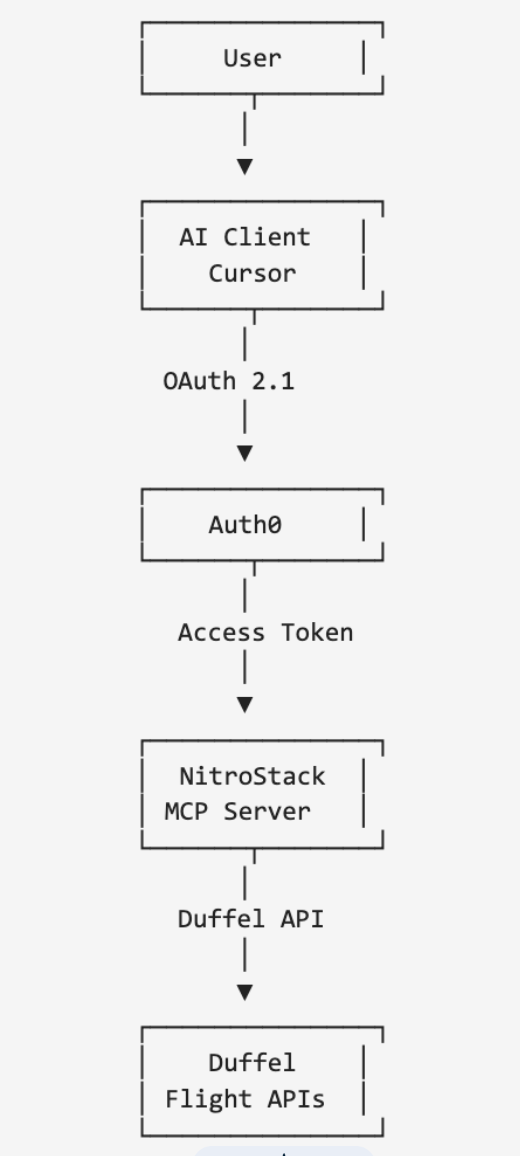
Detailed Component Summary
| Component | Role |
|---|---|
| User | Initiates requests via natural language in an AI environment (Cursor IDE). |
| AI Client (Cursor) | Manages MCP server configuration, initiates OAuth 2.1 PKCE consent flows, stores access tokens securely, and invokes tools. |
| Auth0 | Authenticates user identity, issues signed JWTs with requested scopes (read, write, admin), and manages CORS/callback validation. |
| NitroStack MCP Server | Validates JWT access tokens against Auth0 JWKS endpoint, routes tool calls, and enforces scope authorization rules. |
| Duffel Flight API | Communicates with airline reservation systems to execute real-time flight searches, offer lookups, and ticket orders. |
Step 14: Security Best Practices
When deploying MCP servers with OAuth 2.1 authentication in production, adhere to these fundamental security rules:
- Keep
.envOut of Source Control: Always verify.envis included in.gitignore. Never commit keys to public or private Git repositories. - Protect API Keys & Secrets: Treat
DUFFEL_API_KEYandOAUTH_CLIENT_SECRETas critical secrets. Use environment secrets management (such as AWS Secrets Manager or HashiCorp Vault) in cloud environments. - Enforce OAuth 2.1 for Side-Effecting Tools: Always set
OAUTH_REQUIRED=truein production to prevent unauthenticated access to write and order creation tools (create_order). - Follow Least-Privilege Scoping: Grant client applications only the minimum necessary scopes required for their tasks (e.g., restrict read-only clients to
readscope). - Enforce HTTPS in Production: Never run production MCP endpoints over plain HTTP. Always protect transport layers with SSL/TLS certificates.
- Isolate Development and Production Tenants: Use separate Auth0 tenants and separate Duffel API keys for local testing vs production environments.
Conclusion
Congratulations! You have successfully built, configured, secured, and tested a Flight Booking MCP Server using the NitroStack TypeScript SDK, Duffel API, and Auth0 OAuth 2.1.
Summary of What You Accomplished
- ✅ Initialized a NitroStack MCP Flight Booking project using
npx @nitrostack/cli. - ✅ Integrated Duffel API for real-time flight search and order placement.
- ✅ Configured an Auth0 tenant, registered client applications, and defined custom APIs with
read,write, andadminscopes. - ✅ Set up deterministic environment variable derivation (
AUTH_SERVER_URL,JWKS_URI,TOKEN_ISSUER). - ✅ Verified token issuance using terminal
curlrequests. - ✅ Connected the server to Cursor IDE and completed end-to-end OAuth 2.1 user consent authorization.
Next Steps & Extensibility
This architecture provides a scalable blueprint for building secure AI agent tools. You can extend your NitroStack server by adding custom business logic, integrating payment gateways, or connecting additional travel APIs while relying on Auth0 to maintain robust security and access control.

Hemant Jadhav
Author